Random Bag Night – Eggplant Surprise, er, something….

dsc_0399

This one is definitely putting the “random” in Random Bag Night. This post should be caveatted by the fact that 1. I had the lovely stomach virus last week and I’m *still* not quite right and 2. thanks to the glorious airlines and weather, we got home at 1am last night and I’m therefore completely exhausted. On the upside, it’s easy, it helps clear the pantry, it could be a side or a main (add pasta to it and make it a meal!). I grabbed some pork chops and an eggplant on the way home and the following is what resulted from the eggplant:

1 medium eggplant, peeled and diced into large chunks

1 can artichoke hearts, quartered

1 can kidney beans

1 can (small) of diced tomatoes

1 onion, sliced

1 small clove of garlic, minced

handful of mushrooms, quartered (I used baby bellas)

1/2 cup white wine

1 pinch red pepper flakes (or more if you want heat)

2-3 tablespoons olive oil

2-3 tablespoons of minced parsley

Salt to taste

Place the olive oil and onions into a large (deep) saucepan on low heat and saute until the onions are soft (maybe 7-8 minutes). Add garlic and red pepper flakes and continue to saute for another 2-3 minutes. Add eggplant, mushrooms, beans, and artichoke hearts. Continue to stir, and add a pinch of salt. Allow to saute for 1 minute or so. Turn heat up to medium high, add tomatoes, with juice, and white wine. Cover the pot, and allow the mixture to simmer on medium heat for a while – will take maybe 15-20 minutes for the vegetables to soften and the flavors to mingle. Life the lid and stir occasionally. Once 15 – 20 minutes have passed, lift lid, add parsley and continue to allow simmer. Taste for seasonings, add salt as needed. Should take another 5-6 minutes with the lid off and everything should be nicely softened.

Restaurant Week Boston – Dinner #2 – Meritage

So we started off our Restaurant Week dining with Marco last week which was fantastic, but we have been there before and knew that going in, so no surprises there. Perhaps more highly anticipated by both myself and my husband was the dinner we had set up for Meritage (http://www.meritagetherestaurant.com/) at the Boston Harbor Hotel. Meritage has been on our “must try” list for ages, and every time the restaurant weeks roll around we can never seem to get a reservation (unless we’re willing to eat at 9:30pm on a Tuesday). This time, I pounced, and was able to get a very reasonable 7pm reservation on Sunday night.

We’ve been to the Boston Harbor Hotel for their annual wine dinner series and have had amazing meals prepared by the Meritage staff, so I am expecting to have a helluva meal at Meritage (even if scaled back for restaurant week prices).  So needless to say, when I bit into my pork appetizer (“crispy pork with goat cheese and roasted tomato stuffing”) I was caught off guard by the fact that it tasted like something fried in over-used fry-o-lator oil. I exclaimed to my husband that it tasted like McDonalds’ fries. This is not a good start. My husband had the cod loin, which was better in that it did taste like fresh fish but it was still underwhelming.

The kitchen staff did redeem itself the entrees. I had the scallops which were delicious in their butter sauce, and my husband had the duck with leek ravioli, which was also very tasty.

Dessert was a flight of berry concoctions for me, which was OK, but tasted and looked as though it had been made days ago. Same for my husband’s flight of citrus concoctions. It was nice to have 3 mini desserts instead of 1 but still, definitely not the freshest flavor.

The wine pairing, offered for an extra $17, was worthwhile and the first wine served was a delicious German white. We loved it… and had a huge chuckle when  we realized we had bought a bottle of it at Trader Joe’s earlier that day for $10.99….

So, will we go back to Meritage for a full priced dinner? no. Definitely not. And it joins a list of places who have stellar reputations but seem to cop out on restaurant week dinners (Pigalle, Harvest (sometimes), Sandrines). Just because you’re cutting the price doesn’t mean that the quality of the food should suffer. You’re supposed to be star chefs, so I imagine you could work with cheaper ingredients and still elevate them to a level that makes me want to come back for more on a regular night.

Cheesy Quinoa Cakes with Garlicky Kale

dsc_0350

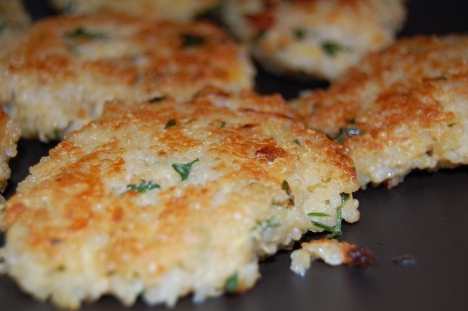
I am a big fan of quinoa. It is one of the only grains you can serve someone who can’t eat wheat, and it’s as versatile as rice. Additionally, despite resembling a carb, quinoa is chock full of protein. The downside to quinoa is, like rice, it doesn’t have much flavor by itself. You can make quinoa in a pilaf or risotto form, as the base of a salad or my favorite – as a quinoa cake. There are many many permutations of this recipe floating out there, so you can be very creative in terms of what you mix into the cake for flavor. These cakes can be served as appetizers or as a main meal, with any number of condiments or sauces. I decided to make it simple tonight with a side of garlicky kale.

I’ve made quinoa cakes a number of times before and I’ve been trying to figure out how to get the cake to hold together well, since quinoa lacks gluten or starch to make it gooey enough. Tonight, I stumbled upon a solution and it starts with how I made the quinoa itself. Instead of steaming it on the stove-top like I normally do, I used my rice cooker. The quinoa came out slightly gooey (maybe a bit over-done?) and that, along with a few other things outlined below, helped me produce my best batch yet. If you don’t have a rice cooker, experiment with adding some flour to the recipe below as a binder, but if you do have a rice cooker, give it a try. Here is the recipe (makes about 15-18 cakes):

1.5 cups uncoooked quinoa

3 cups water

1/4 cup shredded cheddar cheese

1/4 cup grated parmesan cheese

3 tablespoons of plain greek yogurt

1 egg

1 small shallot, minced

1/4 cup chopped fresh parsley

1 teaspoon chopped fresh thyme

1 pinch of salt

4-5 tablespoons of olive oil, plus possibly more

Place the quinoa and the water in the rice cooker and get it going. Once the quinoa is cooked, place it into a mixing bowl, and add the salt, parsley, thyme and shallot, stirring the quinoa so it cools down.  It’s important to cool down the quinoa since you are adding raw egg and you don’t want the egg to cook. Once the quinoa has cooled down for a good 10 minutes, add the egg, yogurt and cheeses, mixing to combine. Using your hands, take a small palmful of the mixture and form into a flattened meatball-like shape and place onto a plate or sheet of wax paper. Continue forming cakes in this way until all the mix is used. 

Place 4 tablespoons of olive oil in a pan and heat it under medium high heat. Once it is good and hot (but not smoking), gently add your quinoa cakes to the pan. Allow the cakes to cook on one side for 5 minutes, flip and cook on the other side for 5 minutes. The cakes should be good and golden brown and cooked all the way through. You may have to do several batches of the cakes. Make sure to add a little extra olive oil between batches as the cakes tend to absorb it as they are cooking.  I served them with a slice of lemon to squeeze over the cakes for an extra zing.

The side dish tonight was just a very simple garlicky kale dish. I make a lot of vegetables this same way, which is how my mom always made them: olive oil, garlic, and a touch of salt.

dsc_0348

6-7 cloves of garlic, smashed

5-6 tablespoons olive oil

generous pinch of salt

1 large bunch of kale, stems removed

Place the olive oil and garlic in a heavy deep saucepan on low heat. With this recipe it is especially important to keep the heat low otherwise the oil will spatter when you add the kale. Allow the garlic to get lightly browned. Take the freashly washed kale and place it in the pan with a pinch of salt and cover it immediately. The excess water on the leaves will help to steam the kale. The kale will take about 15 minutes on low to soften. You should lift the lid and give it a good stir every 3-4 minutes to make sure it doesn’t burn. The kale can be cooked in advance and reheated when you are ready to serve. In fact, it is good to allow the kale to sit in the olive oil and garlic juices for extra flavor.

Random Bag Night – Homemade Ravioli with Spinach Gnudi Filling

dsc_0340

You may recall that a few weeks ago I attempted to make spinach gnudi with no success. I was missing a key ingredient (flour) which would have helped them stay cohesive in the boiling water. Not wanting to be wasteful, I took the gnudi batter (here) and placed it into a ziploc bag and into the freezer it went. Last night, I finally found a use for that batter – it makes an excellent ravioli filling.

With some time to kill (ok, a few hours) on a Saturday night, I made some fresh pasta dough using the following recipe, which yielded about 50 small ravioli. You could just use wonton wrappers instead but where’s the fun in that ?!:

2 cups semolina flour

2 cups durum flour

2 eggs

1/2 cup water

pinch of salt

Mix the flours and salt in a large bowl, then make a small well in the center. Add the eggs and the water to the well. Slowly, using a fork, beat the eggs and water together, then begin incorporating a little flour mix into the egg mixture until a dough starts to form. Continue incorporating flour until the dough begins to dry, the knead the dough to incorporate additional flour until it is fairly solid and not too sticky (about 5 minutes). You will still have a lot of flour left in the bowl, so don’t try to incorporate it all. You’ll need the leftover flour for the rolling out of the dough. Once you’ve finished making the dough, wrap it in plastic and place it in the fridge for at least 30 minutes. When you are ready to roll it out, remove it from the fridge and allow it to come to room temp. Here is what the dough should look like:

dsc_0328

I highly recommend getting a pasta dough lesson from an experienced maker, because the only way to know if this is right is to feel it. The humidity, size of the eggs, etc, will all affect the dough so it is a little tough to get right the first time. The dough should be good and elastic but not too sticky.   If you are in the Boston area, Dave’s Fresh Pasta in Davis Square, Somerville, is an excellent place to take  a lesson.

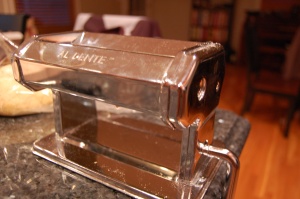
When the dough is ready to go, cut off a piece to work with, maybe 3-4 inches long and an inch thick. You will need a pasta machine for this recipe, as it is very difficult to roll it thin enough by hand.  I use an Al Dente pasta machine, hand crank, and I find it really works great. It came with an attachment to make spaghetti, linguine, etc, so I use it whenever I am making pasta.
dsc_0330

You will need a surface to clamp the pasta maker to, and large enough space to roll out the pasta sheets. You’ll also want a pasta rack (or something to hang the pasta sheets on) so that your sheets can dry out a bit after you roll them:

dsc_0332

To roll out the pasta sheets, set the pasta maker on it’s widest setting (7 on my Al Dente machine). Take your piece of dough and flour it lightly on both sides with the leftover durum/semolina mix. Run it through the machine. Dust it again on both sides, fold it in half and run it through again on the same setting. Repeat one more time. After you have run it through 3 times on the widest setting, set the machine 1 setting lower, and run the dough through. Continue to run it once through on each lower setting (6,5,4,3..) until you get to about setting 3 on the pasta machine (might be 2 on other machines). You will have a very thin sheet of pasta, a bit thinner than you would use to make spaghetti or linguini. Take the sheet and hang it (see picture above) and roll out the rest of your dough in workable pieces.

Once it’s all rolled out, you are ready to assemble the ravioli. Since we plan on doing this reasonably often, we have invested in a ravioli form, which makes ravioli making infinitely easier and faster:dsc_0331

You don’t really need this gadget but if you plan on being a regular ravioli maker, or even an occasional one, it’s a cheap investment and worth while. If you don’t want to get one, you can just cut the ravioli by hand.

dsc_0339

With the ravioli form, you place the dough on top of it (make sure to dust it with flour), place a small spoon of filling in each depression, brush the dough surface with an egg wash  (or water) and fold the remaining dough (or another sheet) on top of it. The egg wash (a lightly beaten egg) helps the dough layers to stick together. Take your rolling pin and roll over top of the entire form and then flip over to release the ravioli.

If you are doing this by hand, lay the dough flat on your counter, and place a spoonful of filling about 1/2 apart along one side of the dough. Brush around the filling with the egg wash and then fold remaining dough over top to enclose. Make sure you firmly press all the way around each mound of filling to seal it. Cut into individual ravioli using a knife.

Once all are assembled – we placed each batch on a piece of wax paper which was dusted with more flour – boil a large pot of salted water. Gently place the ravioli in the water and they will take only about 4  minutes to cook.

We topped ours with a light tomato sauce and some parmesan cheese. The ravioli can be frozen right after you make them (we actually froze half the batch), just make sure they are well floured so they don’t stick together in the freezer. If they are frozen when you cook them, they will just take a few more minutes to cook in the boiling water:

dsc_0342

It’s Restaurant Week in Boston!

Usually for restaurant week (which is technically 2 weeks) we try to sign up for our favorite pricey restaurants as well as trying new ones. Showing some restraint this year, we are only hitting 3 places. The first of which was Marco (http://marcorestaurantboston.com/about/). This is probably our most favorite restaurant in the North End neighborhood of Boston. It’s a tiny little spot, as many of the North End places are, tucked into the second floor of a building just 2 doors down from the iconic Modern Pastry.

The restaurant week menu had many of the more popular dishes on it, with at least 5 or six choices for both appetizer and entree. I always appreciate when there is more than 2 choices, especially if you are trying to coordinate dinner with friends who may or may not be picky/allergic/vegetarian, etc.

Dinner for me started out with a delicious clams casino, with the breadcrumb topping perfectly crisp and the clams delicious and delicate. The only downside – the portion was 3 clams. If you have a bigger appetite, the friend calamari with hot peppers and crispy prosciutto is to die for. The cheese fritters, which my hubby had as an appetizer, were much lighter than we all expected, and they were huge (fist-sized) but since they weren’t heavy balls of fried cheese, it wasn’t overwhelming.

All of us went for the pasta entrees. I think one of the things that Marco does beautifully is simple pasta dishes with fresh and delicious ingredients and pastas. Nothing too fancy or complicated but utterly satisfying and delicious every time. (they do many other things well too, but I appreciate the pasta dishes).

I chose the tagliatelle with bolognese, which was a bowl full of airy light tagliatelle doused with a tasty bolognese. It was the perfect portion, meaty without being heavy. My hub had the orecchiette with broccoli rabe and sausage, a garlicky spicy plate of pasta goodness.

Marco is almost always a stop on our restaurant week list. The place is very tiny, so reservations are always needed.

Update on the Garden

Basil seedlings - The beginnings of something good

Basil seedlings - The beginnings of something good

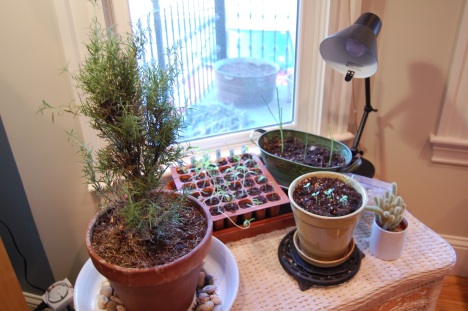
I thought I would post an update on the early stages of our summer garden. We planted seeds about 3 weeks ago in a Burpee starter kit and we are definitely seeing a good start to our summer herbs and vegetables. At the moment, we have everything on top of a wicker chest in front of the kitchen window (which faces West). Unfortunately, with the way homes are here in Boston (one on top of the other), getting good sunlight from a lower level window is nearly impossible, so we’ve supplemented our natural light with 2 grow bulbs which are on about 12 hours a day. Here is what the set-up looks like:

dsc_03261

We’re hoping to get the seedlings hearty enough to plant outside in mid-May, so they’ll be able to thrive and produce tomatoes, etc, a little earlier than last year. I know it would be far easier to buy the plants already well on their way from the local greenhouse, but there’s something very satisfying about seeing things grow from seed.

dsc_0327